Car Detailing for Beginners: Where to Start
Last updated August 3, 2026 · By Mike Turner — reviewed hands-on
If you just watched a detailing video that jumped straight into two-stage paint correction and iron
decontamination, I get why you closed the tab. That's not where anyone starts. It's where people end up
after a season or two of actually washing their car the right way.
Here's the honest version: car detailing isn't one skill, it's five smaller ones — washing, decontaminating,
correcting, protecting, and interior care — stacked in an order that matters more than any single product
you buy. Do them in the wrong order (say, waxing over swirl marks, or scrubbing a dirty car dry) and you can
put more damage into the paint than you remove. Do them in the right order with cheap, correct tools, and
you'll outperform most “quick wash” places on day one.
This guide is the map. It won't turn you into a pro in one read, but it'll tell you exactly what to do
first, what to skip for now, and which of our deeper guides to go read next for each step.
What car detailing actually means
“Detailing” gets used loosely, so let's define it once. A car wash removes loose dirt. Detailing goes
further: it removes dirt safely (without adding scratches), removes bonded contamination the wash missed,
corrects existing paint defects if you choose to, and then protects the paint so the whole cycle gets
easier next time.
Two halves you'll hear referenced constantly:
- Exterior detailing — wash, decontamination, paint correction (polishing), and protection (wax,
sealant, or ceramic). - Interior detailing — vacuuming, upholstery/leather cleaning, glass, and plastics.
Most beginners fixate on paint correction because it's the most visually dramatic part on YouTube. In
practice, washing correctly is the highest-leverage skill you can learn first — it's what prevents the
swirl marks that make correction necessary in the first place.
Here's the mechanism, briefly: your car's clear coat is a thin, hard, transparent layer sitting over the
color coat. It's not indestructible. Every time grit trapped in a wash mitt, a dry towel, or an automatic
car wash's brushes drags across it, it leaves a microscopic scratch. One scratch is invisible. Thousands of
them, all going different directions, catch light and scatter it — that's what you're seeing when a hood
looks “hazy” or shows spiderwebbing under the sun. Detailers call that pattern swirl marks, and under a
bright, direct light (a swirl-finder light) they're impossible to miss even on a car that looks clean
from ten feet away. The entire point of correct washing is simply: stop adding new scratches while you
remove dirt.
The order that actually protects your paint
Every step below builds on the one before it. Skipping ahead is the single most common way beginners
introduce swirl marks into paint that was fine to begin with.
1. Wash — safely, not just “clean”
The goal isn't just dirt removal, it's dirt removal without dragging grit across the clear coat. That
means the two-bucket method (one bucket of wash solution, one of clean rinse water, both with a grit
guard), a pH-neutral soap, and ideally a snow foam or foam cannon pre-wash to lift loose dirt before
a mitt ever touches the paint.
This is the one habit that prevents more damage than any product on the market. If you only change one
thing this month, change how you wash.
- Full breakdown: Two-Bucket Wash Method Explained
- Gear: Best Foam Cannon for Beginners
2. Decontaminate (once your wash routine is solid)
After a few washes, paint often still feels gritty even when it looks clean — that's bonded contamination
(rail dust, tar, industrial fallout) sitting on top of the clear coat, not in it. A clay bar or clay towel,
used correctly, lifts this off. This step isn't urgent for someone detailing their first car this week; it
matters once your wash routine is dialed in and you're ready to prep for correction or protection.
[We'll link the full clay bar decontamination guide here once it's published.]
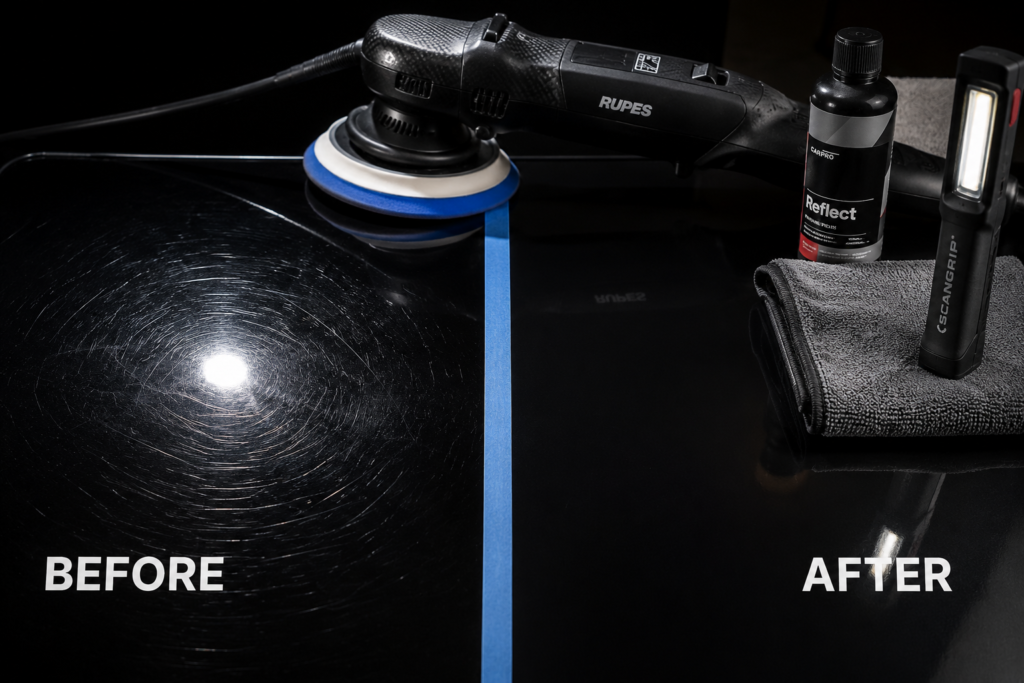
3. Correct — only if you actually have defects worth correcting
Paint correction means machine polishing to reduce swirl marks, holograms, and light scratches sitting in
the clear coat. This is the step people rush into with a dual action (DA) polisher before they've even
mastered washing. You don't need this on day one. You need it once you're seeing swirls under direct light
or a swirl-finder light, and you've got the two steps above locked in.
- Start here: Best Dual Action Polisher for Beginners
- How it's actually done: How to Use a Dual Action Polisher Step by Step
- Diagnosing the problem: How to Remove Swirl Marks
4. Protect
Once paint is clean (and corrected, if needed), a layer of protection — wax, sealant, or ceramic spray —
slows down how fast contamination bonds again and makes the next wash easier. For a beginner, a
consumer-grade wax or spray sealant is the right starting point; ceramic coatings are a bigger investment
and a bigger commitment to prep work, not a first-month purchase.
[Wax vs. sealant vs. ceramic breakdown and the site's wax money page link here once published.]
5. Interior and wheels — don't ignore them
Exterior paint gets all the attention, but interior grime and brake dust on wheels are just as visible to
anyone getting in the car. These get their own guides and gear picks as this cluster builds out — for now,
a basic vacuum and an all-purpose cleaner (APC) diluted appropriately covers 90% of interior needs, and a
dedicated wheel cleaner (never the same soap as your paint) covers wheels.
A realistic first-month timeline
You don't need to do all five steps in one weekend, and trying to usually backfires. A more realistic path:
- Week 1–2: Fix your wash routine. Two buckets, grit guards, pH-neutral soap, microfiber wash mitt,
wash in the shade. Nothing else. This alone will make the car look noticeably better within a few washes. - Week 3–4: Add a proper drying towel and, if budget allows, a foam cannon pre-wash. Start paying
attention to how the paint feels under your hand after washing — grittiness is your cue that decontamination
is next. - Month 2+: If you're seeing swirl marks under a light and want to correct them, that's when a DA
polisher and pads earn their spot in the garage — not before. Protection (wax or sealant) goes on after
correction, or straight after a wash if you're skipping correction for now.
Rushing straight to a polisher in week one, before your wash technique is solid, is how people put new
swirls into the paint faster than the polisher removes old ones.
The kit: what you actually need to start
You do not need $800 of gear to detail your first car well. You need a short list of correct basics — two
buckets with grit guards, a pH-neutral soap, quality microfiber towels, and a drying towel — assembled at
whichever budget makes sense for you.
We put together the full breakdown, at three budget levels, here:
Beginner Car Detailing Kit: What to Include (3 Budgets)
Supporting picks for the accessories that get overlooked but matter a lot in practice:
- Best Microfiber Towels for Cars
- Best Car Drying Towel
- Microfiber GSM Guide: Which to Use for Each Task
If you're unsure which tier to pick: go with the lowest budget that includes the two-bucket setup, a
pH-neutral soap, and at least two dedicated microfiber towels. That combination covers the habit that
matters most (safe washing) without over-investing before you know how much you'll actually use the gear.
Upgrade individual pieces later, once you know which ones you're wearing out.
Mistakes that undo all of the above
A handful of habits account for most of the paint damage beginners cause themselves — usually while trying
to be careful. We cover the full list, with why each one causes damage, in
Detailing Mistakes That Damage Your Paint. The short
version: washing with dish soap, using the same towel on wheels and paint, drying with a dry towel dragged
across the surface, and washing in direct sun are the big four.
FAQ
Do I need to wax my car every time I wash it?
No. Washing is a weekly-to-biweekly habit; wax or sealant protection typically lasts weeks to a few months
depending on the product, so it's applied far less often than you wash.
Is a dual action polisher safe for a beginner to use?
Yes, that's specifically why the DA (as opposed to a rotary polisher) is the beginner-recommended tool —
it's much harder to burn through clear coat with one. See
How to Use a Dual Action Polisher Step by Step
for the actual technique.
What's the single most important thing to get right first?
Your wash method. More paint damage comes from incorrect washing (dirty mitts, wrong towels, no lubrication)
than from anything else a beginner does.
How much should I expect to spend to get started?
See the Beginner Car Detailing Kit guide —
it breaks this down at three budget levels rather than one number, since it depends heavily on what you
already own.
Do I need a garage to detail my car properly?
No, but you do need shade — direct sun causes soap and water to dry on the panel before you can rinse it,
which leads to spotting and streaking. A driveway or carport in the morning or evening works fine.
Can I use dish soap or an all-purpose household cleaner instead of car wash soap?
You can, but you shouldn't. Dish soap is formulated to strip oils, which means it also strips any wax or
sealant protection on the paint and can dry it out over repeated washes. A pH-neutral car wash soap cleans
without doing that — it's one of the cheapest corrections you can make to a routine.
How often should I actually wash my car?
It depends more on your conditions (road salt, tree sap, daily parking situation) than on a fixed schedule —
we cover the specifics in a dedicated guide once it's published. As a starting rule of thumb, weekly to
every two weeks keeps contamination from building up enough to need aggressive decontamination later.